
A screenshot is one of the handiest tools on your iPhone, allowing you to share images with friends, keep directions handy offline, remember important details, capture video stills, use screen grabs to teach computer skills and communicate technical problems. If you haven’t yet mastered the art, or you’ve just recently updated to a new handset model, read on to find out how to take, edit, share and save a screenshot on your iPhone.
What is a screenshot?
A screenshot, also known as a screengrab or screen capture, is a photo of the digital display on your phone screen. By taking a screenshot, you are a creating an image of whatever you happen to be looking at on your phone. You are able to take a screenshot any time you are using your phone, and are then able to save it or share it.
How to take a screenshot on an iPhone
There are three ways to take a screenshot on an iPhone. The model you have will affect how you take a screenshot. Identify which model you have, and follow the steps below to take a screen shot.
iPhones with Face ID
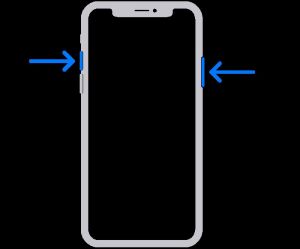
To take a screenshot on an iPhone that has Face ID capabilities, follow the below steps:
Step One: Locate the Side button and the Volume button located on opposite sides of your iPhone.
Step Two: Press the Side button and Volume button simultaneously.
Step Three: After one second, release both buttons.
Step Four: Your screenshot will appear as a thumbnail in the bottom left-hand corner of the screen. You can tap on it to open it, swipe left to dismiss it, or wait a few seconds for it to disappear.
iPhones with Home button and Side Sleep/Wake button
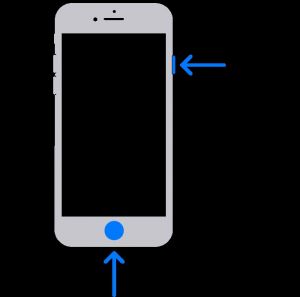
If you want to take a screenshot with the Home and Side buttons, follow the directions below:
Step One: Locate the Home button at the bottom of your device, and the Side button on the right-hand side.
Step Two: Press the Home and Side button simultaneously.
Step Three: After one second, release both buttons.
Step Four: Your screenshot will appear as a thumbnail in the bottom left-hand corner of the screen. You can tap on it to open it, swipe left to dismiss it, or wait a few seconds for it to disappear.
iPhone with Home button and a Top Sleep/Wake button

If your iPhone has a top button, find out how to take a screenshot below:
Step One: Locate the Home button at the bottom of your device and the Sleep/Wake button at the right-hand side on the Top of the device.
Step Two: Press the Home button and Sleep/Wake buttons simultaneously.
Step Three: After one second, release both buttons.
Step Four: Your screenshot will appear as a thumbnail in the bottom left-hand corner of the screen. You can tap on it to open it, swipe left to dismiss it, or wait a few seconds for it to disappear.
After a new iPhone?
Thinking about upgrading iPhones? Check out some of the iPhone 16 plans below.
The following table compares a selection of 24-month 128GB iPhone 16e plans as published on Canstar Blue’s database, listed in order of their standard monthly cost, from the lowest to highest and then by data allowance, largest to smallest. Use our phone plan comparison tool to compare plans from a range of providers.
The following table compares a selection of 24-month 128GB iPhone 16 plans as published on Canstar Blue’s database, listed in order of their standard monthly cost, from the lowest to highest and then by data allowance, largest to smallest. Use our phone plan comparison tool to compare plans from a range of providers. This is a selection of products with links to a referral partner.
The following table compares a selection of 24-month 128GB iPhone 16 Plus plans as published on Canstar Blue’s database, listed in order of their standard monthly cost, from the lowest to highest and then by data allowance, largest to smallest. Use our phone plan comparison tool to compare plans from a range of providers. This is a selection of products with links to a referral partner.
The following table compares a selection of 24-month 128GB iPhone 16 Pro plans as published on Canstar Blue’s database, listed in order of their standard monthly cost, from the lowest to highest and then by data allowance, largest to smallest. Use our phone plan comparison tool to compare plans from a range of providers. This is a selection of products with links to a referral partner.
The following table compares a selection of 24-month 256GB iPhone 16 Pro Max plans as published on Canstar Blue’s database, listed in order of their standard monthly cost, from the lowest to highest and then by data allowance, largest to smallest. Use our phone plan comparison tool to compare plans from a range of providers. This is a selection of products with links to a referral partner.
Apple iOS 14 Tap Back Feature
iPhones 8 and upwards (which are updated with iOS 14) can adjust settings to use the Apple logo on the back of the phone to execute commands, including taking a screenshot. To take a screenshot with this ‘tap-back’ function, follow the steps below:
Step One: Ensure your iPhone is an 8 or above, and has the most recent iOS update.
Step Two: Go to Settings – Accessibility – Touch and tap, Back Tap.
Step Three: Select Double Tap or Triple Tap and choose Screenshot from the list of actions.
Apple iPhone AssistiveTouch Screenshot
If you struggle to reach the buttons (or get the timing right), you can also use the iPhone’s AssistiveTouch function, which allows for easier use. To take a screenshot, enable AssiveTouch in the ‘Accessibility’ section of your Settings, and then select how you would like to take a screenshot, such as by double-tapping on the screen.
How to take a full-page screenshot
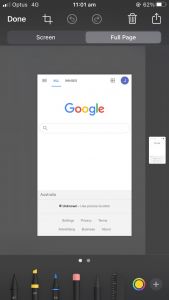
To take a full-page screenshot on an iPhone and not just what’s currently on your phone screen, follow these steps:
Step One: Take a screenshot as you normally would on your iPhone.
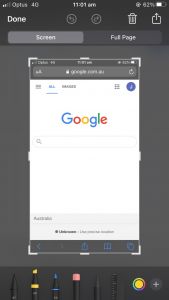
Step Two: Tap on the thumbnail of your screenshot as it pops up, where you’ll be taken to a new screen, which gives you the choice between ‘Screen’ or ‘Full Page’.
Step Three: Tap the ‘Full Page’ option.
Step Four: Tap Done, and choose to save your screenshot as a PDF. You can save your file to the iCloud Drive or to your iPhone’s documents.
How to edit a screenshot on iPhone
You may want to edit a screenshot for a variety of reasons – you may want to draw on it, write something, adjust the saturation, colour, opacity, light and angle, or you may just want to crop the screenshot. Follow the steps below to edit your screenshot.
Step One: To locate your screenshot, open your photo gallery. Select it from your photos.
Step Two: Tap the ‘Edit’ button, located in the right top hand corner.
Step Three: Your editing options will be displayed at the bottom of the screen. The availability of editing options will fluctuate with the range of iPhone models and iOS software.
Screenshot editing options on iPhone
Depending on the model of iPhone you have, there are a range of options for editing a screenshot, including:
- Adjust light and colour
- Add filters
- Crop and rotate
- Instant mark-up
How to adjust light and colour on a screenshot
To adjust the light and colour of your iPhone screenshot, follow the steps below:
Step One: Select your screenshot from your Photo Gallery.
Step Two: Tap ‘Edit’.
Step Three: Tap the Adjust icon. ![]()
Step Four: Scroll through the options to choose colour and light adjustments.
How to add filters to a screenshot
To add filters to your iPhone screenshot, follow the steps below:
Step One: Select your screen shot from the Photo Gallery.
Step Two: Tap ‘Edit’.
Step Three: Tap the Filter icon. ![]()
Step Four: Scroll through the options to apply filters.
How to crop/rotate a screenshot
To crop or rotate your iPhone screenshot, follow the steps below:
Step One: Select your screen shot from the Photo Gallery.
Step Two: Tap ‘Edit’.
Step Three: Tap the Crop icon. ![]()
Step Four: Slide the borders to crop the image.
Step Five: Use the axis plane icons at the bottom of the image to adjust the angle of perspective.
How to Instantly Mark Up a screenshot
If you want to edit your screenshots straight away instead of going to the photo library, you can access instant mark up via the steps below:
Step One: Tap on the thumbnail that appears after you take a screenshot. This will take you straight to the editing options.
Step Two: Edit your screenshot. If you are happy with it, you can choose to save it as an image. If you don’t like it, you can erase your editing and begin again, or delete the screenshot entirely by tapping on the bin icon in the top right-hand corner.
- To draw on your screenshot: Using the pens displayed at the bottom of the screen, you can draw, write and scribble on your screenshot. To change the width of the pen, tap and hold the icon until a tool box appears, which allows you to select the width and opacity of your pen. To change the colour of any pen, tap the coloured circle at the bottom of the page, located on the right-hand side.
- To draw a straight line: The ruler can be adjusted at any angle, by using two fingers to rotate, and can be placed anywhere on the screen. The ruler will stay in place while you use a pen to draw against it, leaving you with a perfectly straight line.
- To erase errors: Tap the pink tipped eraser icon, and move it over the area you would like to erase.
On recent iPhone models, you can cut, copy, delete or duplicate sections of your drawing. Tap the dotted pen, located next to the ruler, and draw around the section you would like to change. Tap and hold the selected area to choose your action.
How to share a screenshot on iPhone
iPhone allows you to share your screenshots through a range of different applications, all of which are explored below.
To share a screenshot from Instant Mark Up:
Step One: Tap on the thumbnail.
Step Two: Press the Share icon, located at the top right of the screen.
Step Three: Select who you would like to share it to. The top row offers your recent and most frequent contacts, while the bottom row offers options for sharing through different apps.
To share a screenshot via Photo Gallery:
Step One: Open the Photo Gallery application and select your screenshot.
Step Two: Tap the Share icon, located in the bottom left of the screen.
Step Three: Select who you would like to share it to. The top row offers your recent and most frequent contacts, while the bottom row offers options for sharing through different apps.
Where are my screenshots saved on my iPhone?
iPhone screenshots are saved in the Photo Gallery. If you have chosen to delete a screenshot, you will not be able to recover it.
How to save a screenshot as a PDF on iPhone
iPhone’s also have the capability to immediately save a screenshot as a PDF, allowing you to pass on information in a secure and more professional way. To save a screenshot as a PDF, take a screenshot as you normally would, then tap the bottom-left corner as the save options come up, and then select ‘Save PDF to Files’.
What to do if my iPhone screenshot isn’t working
If your iPhone isn’t responding to screenshot commands, make sure you are using the correct technique (which will be dependent on your phone model). If the screenshot function still isn’t working, check your settings to see if you’ve accidently changed it, or turn on Assistive Touch or 3D Touch. If it still isn’t working, try restarting your phone and ensuring you’re running the most up to date version of iOS, or reach out to Apple Help if the issue persists.

Photo Credit: insta_photos/shutterstock.com, Apple
Original Author: Luciana Lawe Davies
Share this article