
Want to update your desktop wallpaper with a new picture of your pet? Or do you just need to upload your entire camera roll onto your MacBook to increase your iPhone’s storage space? We’re here to help. And if you’re doubling as a PC or Android user, don’t worry. We’ve got your back, too.
Follow the steps below to see how you can sync your most memorable moments on different products and platforms. Don’t forget to check you are using the latest version of iTunes on your Mac. Sometimes this also requires updating your device’s software to ensure iTunes is compatible with your computer.
Ways to transfer photos from iPhone
Uploading photos and videos from your iPhone doesn’t have to be difficult. And it’s a great way to share your most memorable moments with others, as well as back up your favourite snaps. Here are a number of ways to transfer photos and other content from an iOS device:
- iPhone to iCloud
- iPhone to Mac
- iPhone to Android
- iPhone to PC
How can I transfer photos from iPhone to iCloud?
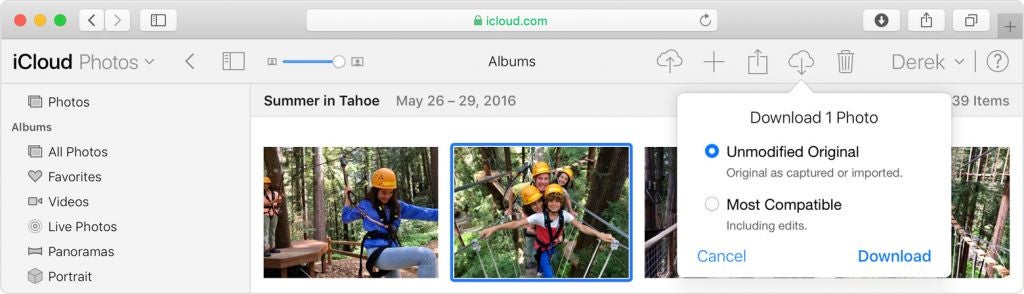
The easiest way to transfer photos from your iPhone might be through iCloud. It automatically saves your snaps once you take your shot. Here’s how to switch the iCloud on and set the feature up:
- Go to the Settings app on your iPhone and use your Apple ID to sign-in. This will automatically turn on iCloud.
- In Settings, select the Photos and any other app you want to sync with iCloud. You can do this by swiping the lock next to the app so it turns green.
- If you want to access iCloud on other devices, you need to complete these steps on each device to make sure everything is up-to-date.
Windows PC users can install iCloud for Windows and follow a similar set of prompts.
How can I transfer photos from iPhone to Mac?
![]()
Need to photoshop your selfie before changing your display picture on Facebook? Follow these steps to see how you can use the ‘Photos’ app on your computer to sync images and videos from iPhone to Mac:
- Upload your photos by connecting the Apple device or digital camera with the USB cable that it comes with. Alternatively, you can insert the SD card from the digital camera into either the SD slot on your Mac or a card reader.
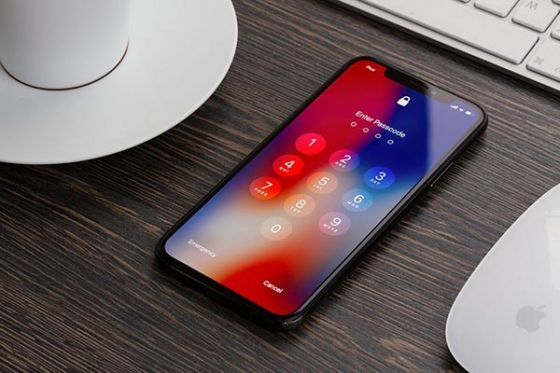
- Make sure your iPhone is unlocked, so your phone screen shows the home screen rather than the lock screen. This typically requires entering your passcode or using Touch ID to on the lock screen. If your phone asks you to ‘Trust This Computer’, tap Trust to continue.
- The Photos app will automatically open on your Mac and take you to the Import screen. All the photos and videos saved in your iPhone should now be showing on your computer screen. If the Photos app doesn’t immediately appear, you can search for the Photos app just by typing it into Finder. Access the Import screen by selecting your iPhone under the ‘Devices’ tab.
- Choose the photos you want to transfer from you iPhone to your Mac. If you want to upload everything, click on the ‘Import All New Items’ button.
- Once you’ve got everything you need, you can disconnect the USB from your mac. If you used an SD card, or a USB cable which doesn’t usually come with the iPhone, then don’t forget to ‘safely eject the device’.
How can I transfer photos from iPhone to Android?
Apple is notorious for having a strong, and sometimes annoyingly complicated, ecosystem. While this makes things easy and convenient for Apple users, it’s not as simple when you add a PC or Android to the mix.
Uploading images from an iPhone to an Android device requires you to manually transfer the photos. This can be done through a variety of ways. For example, you can send photos to yourself over email or use one of the many apps designed to sync media between Android and iOs products. Otherwise, you can always stick to iCloud as this allows you to access your library from any type of device.
Some apps to install on your iPhone include:
- Google Photos: this app can transfer photos between a variety of devices and platforms. Think of it as a more flexible alternative to iCloud. Google Photos is also a useful way to save files and avoid losing them after the syncing process. You will need to sign-in with a Gmail or Google account to access the features.
- Google Drive: the Google Drive app allows you to back up your photos on Google Drive app, as well sync contacts and calendar events.
- Dropbox: Dropbox is described as a ‘collaboration space’ you can use to share files with other people, as well as sync your own content to use on a range of devices. However, this service isn’t free. Prices and storage capacity varies according to which plan you choose.
How can I transfer photos from iPhone to PC?
The Windows Photos app is PC computer users’ answer to Apple’s Photos app. However, the way you upload photos and videos from an iOS device to PC varies between software. For example, transferring images on a computer using Windows 10 will be slightly different to how you sync media to a laptop operating with Windows 8 or Windows 7. But helpful guides are available on the Microsoft website. If you find out that your videos have been rotated incorrectly once the upload process has finished, Apple recommends playing these videos on iTunes to fix the orientation.
Share this article