
Your robot vacuum cleaner is a trusty tool in keeping your floors in check. So, when it’s rundown and out of breath, you’re left with a job half done. As with any household appliance, maintenance is key. Canstar Blue brings you a guide on the problems that could be causing your robovac to malfunction. Read on for details on what parts you should clean and replace to whip your robovac back into shape.

Why is my robot vacuum not working?
With most rechargeable vacuums, the three main problematic areas that may cause a drop in vacuuming performance include:
- Battery: memory effect occurs to many rechargeable batteries, causing them to hold less charge after long periods of use. If your robovac isn’t working to the recommended runtime, its battery might be nearing the end of its life.
- Filters: the robovac might be switching off prematurely or not be running at all if too much dust has built up inside the filters.
- Blockages: different parts of the robovac might become blocked from tangled hair, dust and other threads and will need clearing.
Before commencing any maintenance on your robot vacuum, make sure you switch the unit off.
Solutions
Replacing batteries

If your robot vacuum features a remote control that isn’t functioning, it might need new batteries. If the robovac itself isn’t switching on, or is requiring more regular re-charging, you might need to replace the battery in the unit. It’s recommended to purchase a rechargeable battery from the same brand the unit is from.
Typically, the rechargeable battery is located in the robot vacuum storage compartment. To locate this, remove the dust bin and unlatch the cover of the battery compartment. You might be required to pull the cables out and push a latch to release the battery. Once the old battery is removed, insert the new one, ensuring it clicks into place then refit the cover.
Emptying & cleaning the dust box

Regular cleaning of the dust bin helps prevent blockages. You should aim to empty the dust box of the robot vacuum after each use to ensure it runs to the best of its abilities.
- Depending on your model, you’ll need to lift the lid at the top of the robot vacuum
- Lift out the dust box (you might need to unlatch it by first lifting the handle upwards)
- Push the release button in the direction of the arrows to open the dust box lid
- Empty the dust box
- Refit the lid and place the dust box back in its place
- Close the storage compartment lid, ensuring it locks back in
Before refitting the dust box, you can also clean the dust box. Some robot vacuums feature a cleaning tool, which you can use to clean the dust box and the underside of the lid. In addition, you might also need to clean the dust box seals. To do so, use a damp cloth to wipe the seals. It’s recommended to replace the seals once a year.
Cleaning the exhaust filter
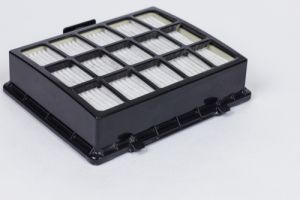
If the vacuum appears to be dead, it might be due to a faulty motor, which can be caused by blocked filters. The exhaust filter compartment is usually located in the dust box.
- Remove the lid from the dust box
- Fold out the filter unit from the dust box
- Remove the pre-filter and clean it with a cleaning tool (if provided, otherwise use a cloth)
- Next, unlatch the exhaust filter and clean it with a cleaning tool
- Refit the exhaust filter into the cover
- Place the pre-filter onto the exhaust filter and carefully refit the filter unit
- Close the dust box lid
It’s suggested to replace the exhaust filter approximately every six months in order to achieve the best possible cleaning results.
Cleaning the side brushes
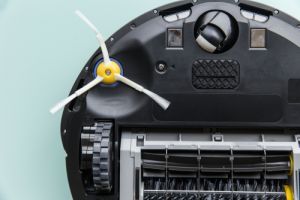
Most robot vacuums feature two elastic side brushes to capture dust. It’s important to clean the side brushes as they can become very dirty over time and cause the vacuum to work less effectively. For this you will require the same cleaning tool mentioned above (if provided).
- Place the robot vacuum upside down and clean the surface with the brush
- Pull off both elastic side brush holders to remove them from the unit
- Hold the brushes over the bin and remove threads and hair using a wiper
- Ensure all threads and hair have fallen out before securing the side brushes back into place (take note if they have ‘Left’ and ‘Right’ markings)
In order to achieve optimum cleaning results, replace the side brushes approximately every year, as recommended by manufacturers.
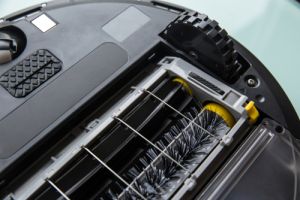
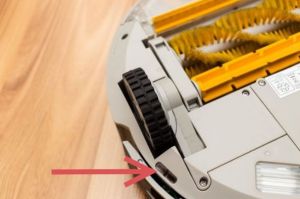
Cleaning the roller brush
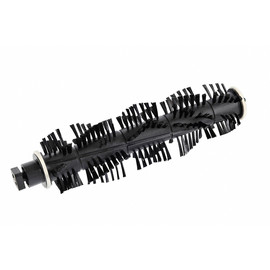
If a blockage has occurred, it might be because of the roller brush bar. Clean the roller brush (picture courtesy of Miele) as required using the same cleaning tool (if provided).
- Flip the robot vacuum upside down
- Remove both of the elastic side brushes to reach the roller brush underneath
- Unlatch the roller brush cover to remove it
- Take out the roller brush
- Cut away any threads or hairs that have wound themselves around the roller brush with a pair of scissors to remove them
- Refit the roller brush into the vacuum, ensuring the correct side goes in first (some models have a pointed end on one side of the roller brush, which will have a corresponding slot)
- Place the cover over the top and click into position
- Refit the elastic side brushes
To help keep your robot vac running smoothly, it’s stated to replace the roller brush each year.
Cleaning the wheels
The wheels are how these bad boys travel around your home, so they might need cleaning from time to time if hair strands or other threads get caught in them.
- Flip the robot upside down
- Unclip the cover and remove the wheels
- Clean the wheels by removing any threads and hair as well as the slot they sit in
- Refit the wheels and make sure they click back into position securely.
Cleaning the sensors
Most robovacs feature sensors to make sure they don’t fall down the stairs. If the sensors are dusty, they might not function correctly. To clean the sensor, simply flip the robot vacuum upside down and use a dry cotton wool bud, carefully removing any dirt.
The sensor may be located near the wheels, however it might be in a different location depending on your model. You might need to refer to the manual if you’re unable to locate it.
Accessories
If your robot vacuum comes with vacuuming accessories, these might also become blocked over time. In addition, static charge could cause a build-up of dust on the vacuum and should be removed with a soft and dry cloth. The plastic accessories can be cleaned with a dry or slightly damp cloth, or with a suitable plastic cleaner solution.
Factory reset
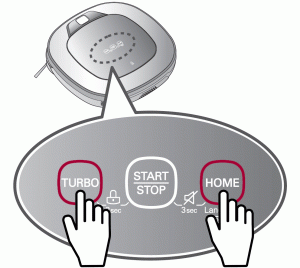
You can reset the vacuum to its factory default settings if required via the remote control. Here are some examples of how to do so for specific brands:
- On a Miele robot vacuum, press and hold the ‘Spot’ and ‘Turbo’ sensors on the display for at least 5 seconds simultaneously. Press ok once an “r:ST” appears on the display.
- For an LG robot vacuum, turn the unit on and press and hold the ‘Turbo’ and ‘Home’ buttons for about 3 to 4 seconds until all the lights light up (as indicated in the picture courtesy of LG). Then press the start/stop button and you’ll hear a tune to indicate it has been reset.
- To reset an iRobot Roomba vacuum, place the unit on the charging base and press the ‘Clean’ button for about 10 seconds until the blue text “r 5 t” is displayed. Release the ‘Clean’ button and it will sound a tone to confirm the reset was successful.
This might differ for other brands, so you might need to refer to your manual for this.
The bottom line
Robot vacuums aren’t cheap, so it’s important to look after them and make sure you’re getting good value for your money over time. Ensure you switch the unit off when it’s not used for long periods of time, such as going away on holidays, and make sure to store it in a well-ventilated, cool area. In the event of a fault, it’s important to contact your dealer or the brand’s customer service line. While you might be able to be mend certain issues, some problems might not have an easy fix. You can also check if the vacuum is under warranty as you might be able to have it replaced if needed.
Picture credits: hamofking/Shutterstock.com, Sergey Mironov/Shutterstock.com, Denis Botarev/Shutterstock.com, Quality Stock Arts/Shutterstock.com
Original Author: Veronika Hleborodova
Share this article